A Blessing and a Thank You!

Hello dear friends! Today I have two cards to share that I made for challenges over on Split Coast this week.

The first was for the color challenge - to use old olive, night of navy and daffodil. I kind of blended the required colors by sponging inks over my image panel.

I just love this Irish Cottage stamp don't you? My images are from the Irish Blessings set by Waltzingmouse Stamps . I will use this as a birthday card - I need several for friends with birthdays in January! I think it will work well for either a guy or a girl birthday.

Stamps: Waltzingmouse - Irish Blessing
Paper: white - PTI, Night of Navy & Barely Banana - SU
Ink: Memento Tuxedo Black, Ranger Distress - Weathered wood, faded jeans, scattered straw, bundled sage & Crushed Olive
Accessories: brads - Basic Grey, blending tool & nonstick craft mat - Ranger, Copics - E13


My second card was made for the Inspiration Challenge which was a great website of the art of record album covers called Project Thirty Three (are you old enough to remember record albums?! LOL!!) - I was inspired by this fun graphic album cover I used my Classic Inverted Scalloped square nestabilities and punched circles to adhere over it. Then I just added my sentiment from the WMS set Asian Gardens- easy peasy! And we'll all be needing Thank You cards after Christmas right?! You could make a dozen of these really quickly!
Stamps: Waltzingmouse - Asian Gardens
Paper: Vintage Cream - PTI, Black - SU
Ink: Memento Tuxedo Black
Accessories: circle punch - SU, Classic Inverted Scalloped Square Nestabilities,

Two Ways to Package the Cash!

I always give my son and his girlfriend money for Christmas along with other smaller presents so they are able to get something they really want - that will fit - etc! This year I just gave them cash so they wouldn't even have to go to the bank to cash a check (my son sometimes forgets to cash a check for a while!) but I wanted to dress it up a little bit rather than just tuck it in an envelope....

So - for April - who loves purple - I made this cute little purse using a die from Papertrey Ink. I stamped the sentiment from Compliments of the Season by Waltzingmouse and then die cut it using Fancy Tags from Spellbinders - cutting off the left edge where I put my hand made felt flower. Then I just tied a piece of wrinkled seam tape around the handle as well as the roll of cash - which I then tucked inside the 'purse'!

For Josh I wanted a masculine look -so I used paper from Cosmo Cricket Wanted/Slim Jim. I cut two panels using the Top Note from Stampin Up, then I cut one in half and layered it over the full cut. I used Scor Tape on two sides and the bottom to hold it securely - then just stapled it to 'guy' it up!
I stamped the sentiment - again from Compliments of the Season from Waltzingmouse - and die cut it with Labels Sixteen Nestabilities. I adhered that to the bottom half. Then I added a jumbo brad and looped a piece of ribbon through tying it with twine.
I put a metal clip on the bills to hold them together and tucked them into the gift card! April always appreciates my special packaging - she will put this on her desk at work or on a shelf at home.

Thanks so much for stopping by today!
Purse:
Stamps: Waltzingmouse - Compliments of the Season
Paper: Vintage Cream - PTI, DP My Minds Eye 29th St Market
Ink: Memento Tuxedo Black, Ranger Distress Milled Lavender
Accessories: Favor it Box 1 - Papertrey Ink, Fancy Tags - Spellbinders, Felt & sticky pearls - Michaels, Scotch Quick Dry Adhesive, wrinkled seam tape - http://www.prairiebirdboutique.etsy.com
Top Note:
Stamps: Waltzingmouse - Compliments of the Season
Paper: Creamy Caramel - SU, DP Cosmo Cricket/Wanted/Slim Jim
Ink: Memento Tuxedo Black, Ranger Distress - Tea Dye
Accessories: Labels 16 Nestabilities, Top Note Die, Jumbo Eyelets, & Ribbon Originals Alpine - Stampin Up, Twine - PTI, friend metal clip - Making Memories, Staples - Close to my Heart.

Baby Mine

What to give a little munchkin like this for his very first Christmas?? Well - his Grandaunt Julia (that would be me!) decided to make him a little coaster photobook for his mum Katie (my niece) and his dad, Greg, to document his first year.

I used 13 light weight coasters for my book as well as my Bind it All with 1 1/4" O wires. I used Little Prince Stickers by Karen Foster Design as well as some puffy stickers by Michaels - all purchased at Michaels. I created 'Landon's 1st year' with my Brothers P Touch Label Maker.

Each page is for Katie and Greg to document that month in Landon's life with a picture from that month and a few sentences about what he did new that month. The sticker on this page says "Bundle of Joy".
I cut the lined patterned paper (Cosmo Cricket/Boyfriend/Homework) with my Labels One Nestability. The stamps for the month circle are from Papertrey Ink (Borders & Corners Monogram Edition and Simple Alphabet)

These great little boy papers are from Itsy Bitsy Paper pad by K & Company that I got at Michaels with a 20% off coupon! It has patterns on the front and back of each sheet so it gives you a lot of variety. The sticker on this page says "The Cutest Little Baby Face".

I cut the papers 4"x 4" and used my corner rounder punch on all corners then adhered the papers to the front and back of each coaster. The sticker here says 'Heaven Sent'

As I created each page - I'd flip the coaster up to be sure I was placing things right side up when the book was put together - and to be sure that the papers had coordinating colors. You also don't want to have stickers too near the area where you will punch with the Bind It All. In my case - I made sure the lined paper panel was not too close to the bottom of the coaster.

This sticker says "little ears, little nose, little fingers, little toes"
Landon has several toys and outfits with monkeys on them so these puffy stickers were perfect!
This sticker says "Thank Heaven for Little Boys"
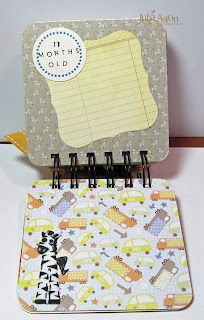


And on the last page - I used special 1st Birthday patterned papers with numbers and balloons from Basic Grey Cupcake Paper pad. The Happy First Birthday stamp is from Bitty Baby Blessings from Papertrey Ink

I knotted several coordinating ribbons (Papertrey & Stampin Up) on the wires. Finally, on the back cover I wrote a personal note to Landon - so he'd always remember that I made this book especially for him for his very First Christmas!

A final picture - taken on Christmas Day - with an exhausted Landon sleeping peacefully in his Uncle Nate's arms (Nate and my niece Christie (Katie's older sister) are expecting their first baby in June so he's practicing - and doing a great job as you can see!)
That's DH Kent to his right - and check out the white mug on the table - it has a picture of Landon on it! I had them made through Snapfish and gave one to each of my nieces as well as my sister (and myself of course!).

Well- thanks for sticking with me to the end of this long post! I hope you all had a wonderful Christmas and were able to relax today!
If you are interested - you will find another baby coaster book I made last year on this post here.
It has been flurrying here all day and it has just started snowing in earnest with quite a wind. They are predicting up to 20 inches by tomorrow night! I'm so glad I'm still out on medical leave so I don't have to try and commute tomorrow. I think I'll do some stamping!
Public Service announcement! Rubbernecker is having a sale!! Stamps will be on sale from 12/26/10 - 1/2/11 and other products are on sale for 2 days 12/26 - 12/28 so hurry over and check it out!

Fill this Day with Joy

What a relief! Last Friday's Free 4 All challenge on Split Coast was to make a birthday card - no holiday cards allowed!

I pulled out my long neglected Everyday Button Bits set by PTI and made a fun little hot air balloon scene. I seem to be on a roll of dry embossing frames with my nesties lately. I just love this look!

I masked the edges of my scene with Eclipse tape after stamping the landscape and balloons and then sponged in the sky.

The image panel is up on foam tape. I thought this sentiment would be quite uplifting for the birthday girl/boy! Inside I stamped 'sending birthday wishes' from the same stamp set.

If you are new to my blog, you can see my tutorial on how I dry embossed my frame on this blog post.

If you celebrate - I hope your preparations are now all complete and you are enjoying the blessedness as we celebrate the gift of Jesus' birth!

ETA: check out the PSA Stamp Camp blog for some holiday table creations I made.

Stamps: Everyday Button Bits - Papertrey Ink
Paper: white - PTI
Ink: Memento - tuxedo black, desert sand, rich cocoa, potters clay, Ranger Distress - Peeled paint, weathered wood
Accessories: square nestabilities, vintage buttons & narrow silk ribbon - PTI, Eclipse tape (for masking), glue dots, blender tool - Ranger,

Inspired by Scandinavia

Hello dear stampers! My card today was made for two challenges. The color challenge over on Split Coast this week was to use red, white & black and the dessert option was to use hearts.

My design was inspired by the Shabby Tea Room inspiration photo this week entitled 'Scandinavian Christmas'.
I punched and embossed a silver heart, stamped the 'stitched' heart and die cut the bird. I dry embossed the deckled edge rectangle nestie to frame it all up and tied the wrinkled seam tape and gingham ribbon around the card.

Inside I stamped "Nothing warms the heart like an old friend". This sentiment and stitched heart are from Sewing Box Hugs by Waltzingmouse Stamps

Thanks so much for stopping by today - gotta run and wrap some presents!

Stamps: Waltzingmouse Stamps - Sewing Box Hugs
Paper: white, pure poppy - PTI, Silver - Canford Card, DP - October Afternoon/Thrift Shop/One of a kind
Ink: Ranger Distress - Barn Door, Antique Linen
Accessories: Brad - Basic Grey, glue dots, bird - Tim Holtz Alterations Sizzix die, Mega deckled edge & heart - Nestabilities, wrinkled seam tape - Prairie Bird Boutique Etsy shop, gingham ribbon - SU, vintage button & twine - PTI, heart punch - EK success, snow flake punch - Martha Stewart

A Little Glitter on the Evergreen

I made these two cards for the Ways To Use It Challenge on Split Coast last Thursday. The challenge was to use glitter!

My cards are very CAS - I embossed a nestie square in the center of my 4 1/4" x 4 1/4" cards - then I stamped this lovely framed evergreen block from Rubbernecker onto a 2 1/8" x 2 1/8" panel, went over it with my glue pen and sprinkled glitter over it. I adhered the panel inside the embossed frame with foam tape.

On the top card I used Dazzling Diamonds which makes it look like it has snow on the branch. (can you see it on my pic??)

For the 2nd card I used a blue topaz coarse glitter. I like how it added the touch of another color to the green stamping of the branch.

I'll stamp a sentiment inside depending on whether I need this as a Christmas card or for some other occasion after the holidays!

If you are new to my blog and want to see how I do the dry embossing with the Nestabilities - check out my tutorial here.

Thanks so much for coming by - I hope you are all set for the holidays so you can relax and enjoy them!
Stamps: Rubbernecker - Stamp Oasis Winter Holiday Evergreen block #1574-50
Paper: white - PTI
Ink: Ranger Distress Peeled Paint
Accessories: blue topaz course glitter -Martha Stewart, quickie glue pen, square nestability, foam tape

Packaging up the Pumpkin Scones

I usually give food gifts to my bosses and co-workers and this year one of the things I made was pumpkin scones. I needed a way to wrap them and came up with this idea.

I used large kraft coffee bags from PTI and decorated them using the Santa from Around Christmastime and a sentiment from Twas the Night before Christmas - both from Waltzingmouse Stamps.
The gold bell, ferns and snowflakes are Martha Stewart punches.
These pumpkin scones are absolutely delicious - I found the recipe on Mara's blog here - they come out soft inside - (not hard and crunchy like some scones that you have to dip in tea just to be able to chew them! LOL!) My co-workers loved them as well!

So if you need an idea for food packaging - maybe my post is in time for you to whip one up for Christmas giving!!?? or you could at least make the yummy scones!
Stamps: Waltzingmouse - Around Christmastime, Twas the Night before Christmas
Paper: Pure poppy, white - PTI, Gold - unknown, Handsome Hunter - SU
Ink: Memento Tuxedo Black
Accessories - Martha Stewart punches - snowflake, bell, fern, Nestabilities - large scalloped circles, circles, Copics: R29, R20, E00, red brad - Basic Grey, brown bag - PTI, foam tape.

Saturday Waltzingmouse Sketch - Merci!

Welcome dear stampers to another Saturday as well as another Waltzingmouse Sketch challenge! Today we have a fun envelope-look design - what will you create from this??
I went with the literal envelope look on my card. I used my new Classic Diamonds Nestabilities to cut the 'flap' part of my design (I cut the diamond then cut it in half from corner to corner - it measures 5" across)

I used one of the background stamps from Pic-Nic Patterns for the flap and the base stamping, circle and sentiment are all from Victorian Frippery (I just love both of these sets!)
I figured I'd be needing some thank you notes in a week or so!

Check out the WMS Sketch Blog and get inspired by the cards the Mischief Makers and other DT members have created using this week's sketch.

Then make your own card using the sketch and link it on the Sketch Blog by Thursday 1/6/11 at 11:59 pm EST - you could be chosen Top Mouse !! Winners are announced each Saturday along with the new sketch challenge.

The Saturday Waltzingmouse Sketch Challenge will be taking a two week break for Christmas and New Years so the next WMS sketch will be posted on Saturday January 8th!

For those who celebrate - I wish you and yours a most blessed Christmas!

If you missed the Waltzingmouse 12 Days of Christmas - check it out
here.
This card is also for the SCS inspiration challenge today - I guess I'm out of the loop - but apparently Canadian hockey commentator (coach?) Don Cherry wears very colorful jackets on TV and there is even a blog that shows them all! So these jackets were our inspiration challenge today! I was inspired by this purple velvet Victorian smoking jacket

I'll be posting a few things next week - so I hope you have a chance to drop by!
Stamps: Waltzingmouse - Pic-Nic Patterns, Victorian Frippery
Paper: White, Soft Stone, Plum Pudding - PTI
Ink: Memento Tuxedo Black, Ranger Distress -Milled Lavender, Dusty Concord, Old Paper
Accessories: Labels Four, Circles & Classic Diamonds - Nestabilities, foam tape, Sticky gems - Michaels, Plum Pudding Twill - PTI.

A gift for the Pastor

Our new minister has been at our church for just 6 months so this is his first Christmas with us. I wanted to give him something other than baked goods or wine (!) and I thought some note cards might be nice.

I saw a card in blogland using the stamps on this first card but I didn't note where I found it - so if it's your card please let me know and I'll link to you!

I used rustic cream cardstock from PTI to make it masculine and also drew a border around the card with an 01 Micron Pen. The floral is from Life and the quote is from Out on a Limb Sentiments - both by PTI.

For my next 2 designs I used crosses from the Spellbinders Cross Collection - sponging them before taking them out of the die. I used Soft Stone card stock from PTI for the crosses for a little contrast in color. I used Ranger Distress Antique Linen ink for the sponging.
The Bible Verses are both from Everyday Blessings by PTI.

For my 4th card for this note set I used a cross from Everyday Blessings by PTI and a Bible verse from Beautiful Scriptures by Clear Dollar Stamps.

I bundled the 8 cards and envelopes (2 of each design) into a clear box that I tied with a simple narrow silk ribbon from PTI. I made a tag using a scalloped tag Spellbinders die, added a couple of punched ferns and the sentiment from Wordsworth

Here's a close up of the tag - I silver embossed my Victorian Damask stamp by Rubbernecker onto silver cardstock.

I hope he likes them!
Remember to check out the final days of the Waltzingmouse 12 Days of Christmas - today Mona has something to inspire us and Friday Joan will be posting something fun!

And I hope you'll check back on Saturday for the Waltzingmouse Sketch!

ETA: check out PSA Stamp Camp Blog - Libby is offering a free stamp set to one lucky commenter!

Wear Your Best Dress!

Hello dear stampers! I made this card for Saturday's Inspiration Challenge over at Split Coast. Stephanie linked us to the Shabby Apple - a wonderful women's clothing shop.

I've been wanting to try making pleated ribbon on a card so I chose this pretty Ming Dress to inspire my card.
To pleat my ribbon I laid a strip of Scor Tape along the bottom of my panel. Then I laid the silk ribbon along it folding it as I went. I sewed along the top to flatten it down and hold the pleats and attached my patterned paper over the stitching. How do you pleat your ribbon on a card??
I used PTI dies for my felt flower and cut the sentiment with a square Nestability. I sponged them both with Antique Linen ink.

The fun teaparty stamp is from Afternoon Tea Sentiments by Waltzingmouse Stamps


Today is Day 10 of Waltzingmouse Christmas and Laurie has something to inspire us - Thursday you'll want to check out what Mona will be posting for Day 11 and Friday Joan will wrap it up on day 12!


ETA: Libby has started a Monday Inspiration Challenge over at PSA Essentials - check it out!

Stamps: Waltzingmouse Stamps - Afternoon Tea Sentiments
Paper: White, Text Style Black & White Basics - PTI
Ink: Memento Tuxedo Black, Ranger Distress Antique Linen
Accessories: glue dot, foam tape, scor tape, sewing machine, silk ribbon - Stamp Simply Ribbon Shop, large brad - American Crafts, cropadile, ZVA self adhesive pearls, white felt - Michaels, beautiful blooms II #1 flower die - PTI, square nestabilities, blender tool & nonstick craft mat

Mukkoti Ekadasi 2010 | Greetings,e-Cards for Vaikunta Ekadasi | Telugu,Kannada,Tamil Greetings,Orkut Scraps,Wishes,Messages,Quotes,Wallpapers,Gifs,Emails

Tags: Vaikunta Ekadasi Scraps , Greetings , e-Cards , Wishes for Orkut,Facebook and Send Emails. Mukkoti Ekadasi 2010 . Greetings,e-Cards for Vaikunta Ekadasi . Telugu,Kannada,Tamil Greetings,Orkut Scraps,Wishes,Messages,Quotes,Wallpapers,Gifs,Emails
Mukkoti Ekadasi 2010  Greetings,e-Cards for Vaikunta Ekadasi.

Copy the code below and paste it in Orkut, Facebook, Myspace, Hi5 etc.
Email, Tweet, Share, Bookmark, Post options to various websites and blogs


Vaikunta Ekadasi Scraps  Greetings.

Copy the code below and paste it in Orkut, Facebook, Myspace, Hi5 etc.
Email, Tweet, Share, Bookmark, Post options to various websites and blogs


Happy Vaikunta Ekadasi .

Copy the code below and paste it in Orkut, Facebook, Myspace, Hi5 etc.
Email, Tweet, Share, Bookmark, Post options to various websites and blogs


.