Showing posts with label Amuse. Show all posts

A Thanksgiving Ship and a Strawberry B'day

I promised to share with you the projects I taught at my class at the Paper Tree this weekend. We made this great Mayflower ship and two clean and simple Thanksgiving cards. The sail is made using the Labels Eight Nestabilities. I inked all over them with a Chai ink cube. The paper for the ships is woodgrain by Amuse.

The template for this super ship was made by Qbee and can be found on Split Coast here. It's the perfect size to place at each guests seat at your Thanksgiving table filled with nuts or candys. Last year I made some and stamped everyone's name on the sail as place markers.
The cards are each 4x4 size with score lines at top and bottom. The cute turkey wagon stamp is by Amuse. (may be retired). The sentiment is Just Rite Stamps - Brayton Font 50 pt

This fun pilgrim hat is by Inkadinkado (may be retired) and the sentiment is by Hero Arts. I colored both images with Copics.

On this Mayflower the stamps are Stampin up - Hello from All Occasions Sayings and Happy Thanksgiving from All Year Cheer III (I think both sets are retired)

I love how cute these are! And they go together really easily - I'm making them for everyone this year!

Next up is my card for the challenge on Split Coast today.

Dawn (treasureoiler) was the featured stamper . I needed to make a b'day card for my 4 year old God-Daughter, Eden and I knew I'd find a wonderful card to CASE because Dawn uses lots of cute little girl stamps on her cards!

Sure enough I found this adorable card to CASE.

I changed the image, the colors and added a lacey punched edge as well as the number 4.

Eden loves Strawberry Shortcake - so I found an image on line and printed it on card stock. I colored it with Copics and framed it with circle Nestabilities. I added a couple of gemstones for a touch of glitter! I'll be giving her this tomorrow night along with a few gifts - we're getting together for a little tea party!
Thanks so much for coming by!
Stamps: the number 4 - Clear Art Stamps Birthday set
Paper: Pure Poppy, white - PTI, Sage Shadow - SU, DP Cosmo Cricket - Early bird/cherry pie
Ink: Pure Poppy - PTI
Accessories: Strawberry Shortcake image from web, Circle nestability, pinking circle nestability, scalloped circle punch, circle punches, foam dimensionals, saddle stitched ribbon Ocean Tides - PTI, Martha Stewart lacey punch, Copics: BG10, BG11, YGo5, YG09, Yo2, RV1

Two Sketches of His Word


I'm finally caught up with my biweekly His Holy Name pages! Somehow the weeks had come and gone and I was suddenly 3 challenges behind! This 6x6 page is for Week 22 and God's attribute of Peace. I chose Isaiah 26:12 to illustrate this attribute.
I used all Amuse designer papers on this page. The ribbon and buttons are Papertrey Ink.
I used Friday's Taylored Expressions sketch for this page
Stamps: none
Paper: vintage cream - PTI, Ruby Red - SU, DP's - Amuse
Ink: none
Accessories: glue dots, foam dimensionals, modern label punch - SU, circle punches, square nestability, spring rain saddle stitched ribbon and Vintage buttons - PTI

And here is my 6x6 page for Week 21 of the His Holy Name Challenges. God's attribute for this week was Sanctifies. I chose this verse from John 17:17 to illustrate this attribute.

I used the MojoMonday sketch for my page. The papers are all Basic Grey Bittersweet.You can find the His Holy Name Challenges here in the forums on Split Coast.

Stamps: none
Paper: Dark Chocolate, Vintage Cream - PTI, Purely Pomegranate - SU, DP basic grey/bittersweet
Ink: Purely Pomegranate - SU
Accessories: foam dimensionals, glue dots, sponge, Prima flower, pinking circle nestabilities, circle nestabilities, modern label punch - SU, computer generated verse, butterfly punch - Martha Stewart, Scarlet jewel saddle stitched ribbon - PTI

Oh Christmas Tree

The Limited Supplies challenge on Split Coast a while ago was to use a Christmas tree on your card. I tried to keep the supplies limited but I was also doing Taylor's sketch for that week on this card so it ended up with more than a few layers!

I used a circle and pinking circle nestability to frame my image and two Cuttblebug folders, the snowflake and Swiss Dots. The sentiment by Rubber Soul was punched with the Word Window punch from SU.

At least my bare little Amuse tree has limited decorations on it! (and check it out - it's on sale!)

Thanks for stopping by today!

Stamps: bare tree: Amuse, sentiment: Rubber Soul
Paper: spring moss, sweet blush, aqua mist, vintage cream: PTI, DP My Minds Eye-Be Merry Trim the tree
Ink: memento tuxedo black, Spring Moss: PTI
Accessories: Copics: E09, E35, sponge, dew drop, glue dot, foam dimensionals, word window porch: SU, Snowflake and Swiss Dots Cuttlebug Folders, Circle and Pinking Circle Nestabilities, Dotted Swiss Sweet Blush Ribbon: PTI

Fun with Copics and Amuse Stamps!

I took a Copics class Friday night at the Papertree Store in Manchester, NH (Hi Michelle!) that was taught by Amuse Instructor Jennifer Daloisio (Hi Jenn!) Here are the wonderful cards that we made. All of the stamps and papers are by Amuse.

This masculine card below was made using the Pallette Blending Technique - you use this technique when you only have a light and dark color and no third color to make your color blend gradual. This is how Jenn described the technique: "Color lightest color on image. Color darkest color on an acrylic block. Using the lighter color marker pick up the darker color off the acrylic block onto the tip . Starting at the edges that you want the darkest, color pulling it into the center. Repeat until you are happy with the look".

This was the most difficult technique we used and none of us liked it very much (!) as it was hard to control the darkness of the color - but it was good to know in case we were coloring and didn't have the right shades of Copics.

All of the next cards were colored using two or three shades of similar color Copics. We started coloring the whole image with the lightest shade - then added the darkest shades to the edges we wanted to shadow - then added the middle shade next to the darkest shade - then blended over the whole thing again with the lightest shade. We repeated this process until we had the look we desired. (phew!)

Look how cute this elephant with the baby is (and we thought only the Stork delivered babies!) an the little girl swinging in the tree is just adorable.

I loved the trio of cupcakes (they made me hungry for one!) and what a fun carrot car!


I'm posting these from the cottage in NH! (yes - I may not stamp when away but I have to be on my lap top so I can still check out everyone's blogs!)

Thanks for dropping by today.

Hot Tip: Today's the day Waltzingmouse Stamps is releasing 4 new wonderful sets - there's a Halloween set, A Christmas set, a pretty little angel set with different outfits! and a super labels set so there's sure to be something that 'Tickles' as Claire always says!

A Knight at the Castle

Aren't these castles just the cutest things??? You can find Claire Brennan's tutorial for them here. They are about 12" in height including the flag pole!

I made this one using the fun Basic Grey Lime Rickey/Liquid Candy designer paper for the castle panels. The base is a green Bazzill card stock. The knight is from Lizzie Anne Designs and the trees and sentiment are from two different Cornish Heritage Farms sets - Making the Grade and Forest Friendzy. I adhered a tree on each side of the castle as well as a hedgehog or mushroom.

These are all the stampings I used on the castle and the card below.

Here is a card I made to go along with the castle - using the same stamps. I used the Forest Branches Cuttlebug folder on the back panel and a Labels Four Nestability to cut the piece of designer paper. All the images are colored with Copics. I used the small oval Stampin Up punch for the sentiment on the castle. For the card sentiment I juse used the corner rounder on one end and cut out a triangle on the other end. Everything is popped up on foam dimensionals.

I made this second castle a little more sedate. I thought it would be a fun Welcome to your New Home gift with some treats tucked inside. The sentiment is from Amuse and says "May your house always be too small to hold all your friends." Irish Proverb

This designer paper is Basic Grey Porcelain/bellamy. The base of the castle is Certainly Celery by Stampin Up. The chipboard trees are from Maya Road.

On this castle I used the Distressed Stripes Cuttlebug folder on the roof piece and inked it with white chalk ink as suggested by Claire in her tutorial. The flag is just a strip of designer paper curled and glued around a toothpick with a triangle cut out of the end.

And here is the coordinating card I made for this castle.
The uses for this cute castle are limitless - wouldn't it be fun in pink and purples with a princess stamp for a little girls b'day? And they aren't as hard to make as they look - Claire goes through each step with pictures and written descriptions. I made one up with computer paper first just to be sure I understood each step - that way I didn't waste good card stock in the learning process!
Thought you might like to see a few pics of our vacation: Here is a side view of my SIL's cottage in the woods from the driveway.
and here is the front view - we can see a little bit of Merry Meeting Lake through the trees - which is behind me as I'm taking this pic - the cottage is across the street from the lake but we have a right-of-way where we can access it. Here is Kent on the lake - and you can see the front of my kayak - we were out for two hours on this day - and just after we got back and up to the cottage we had a downpour! Rain can come quickly when you are in between the mountains here.And here's me! The water was pretty calm going down but on our way back we were heading into the wind - and we really had to paddle!

This is one of our cats, Boo, sitting on the favorite pet sofa by the picture window - watching Kent as he makes his way to the door!

Thanks for coming by today!

Christmas Crackers

I'm on vacation and don't have any stamping stuff with me (gasp!!!) but I will be posting a few fun stamped crafts that I've made recently so be sure to check back!

I found a great tutorial for these cute Animal Cracker boxes on Tracy Harp's blog. She shows several different samples to inspire you! I made mine with PTI Berry Sorbet card stock and Christmasey Amuse papers.

I filled them with frosted candy cane sugar cookies that I made from a mix and colored with red food coloring. I used a giant brad from American Crafts that you slip the cover behind to hold it closed.

I used my oval Coluzzle to cut the window and then used the cut out oval for the tag. A piece of acetate is attached behind the cut out. I hung my tag around the ribbon handle using a chain by Tandy Leather that I got at Michaels in the jewelry section. I stamped the tag with an Amuse stamp called "Santa's Cookies" of a fun plate of cookies and a mug with a note that says 'For Santa' on it. I couldn't find it on the AMUSE site so it may be last years stamp (?). I doodled around the edges of the tag with a black Micro marker.

Note: I think you could use an oval punch for the window instead of the Coluzzle if it's strong enough to go through 2 layers of paper - but the box panel is too wide to use a Nestability oval with the Cuttlebug.

My handles are made with PTI Twill in Berry Sorbet and Vintage Cream. You punch a hole in the side panels - add eyelets and knot the ribbon on each end on the inside.

Wouldn't this be a fun way to leave cookies for Santa on Christmas Eve? Actually - it's a fun box to give treats to anyone for the holidays or any time!!

Thanks for coming by today!

A Summer Tweet

The Clean and Simple challenge on Split Coast this week was to use the summer colors of turquoise, orange and blue. And as luck would have it - the DoubleDog Dare Challenge a few weeks ago made by Joanne (Sleepyinseattle) (which I hadn't gotten to yet!) - was to use orange, yellow and blue - so I'm hitting two birds with one card so to speak!!

The bird is cut from the small and medium Shapeability Nested Birds and mounted with foam dimensionals on the card. I scored three lines above and below for a little depth on the card. Pretty clean and simple! The sentiment is from the Amuse stamp set called Nature.


We'd love to have you join along with the weekly Doubledog Dare challenges - just load your challenge card in your SCS gallery and use the keyword DDC - you can see all the DDC cards here.

Reminder: check here for info on winning my blog candy!

Stamps: Amuse: Nature Set
Paper: Tempting Turquoise: SU, Lemon Tart: PTI, DP Little Yellow Bicycle Geometric Orange
Ink: Memento Tuxedo Black
Accessories: brad: Making Memories, foam dimensionals, shapeabilities: Nested Birds, ScorPal

You're Tweet!

Stef showed us a wonderful little kids shoe website, Bugaloo, for the inspiration challenge over at Split Coast. I was inspired by many of them! but finally settled on this cute pair.
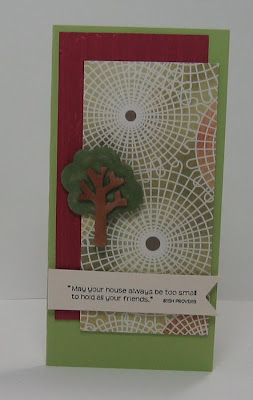
I cut my branch with a Sizzix leaf/stem die and the cut outs are a leaf from Spellbinder Flower Creations 3. The bird is a Spellbinder also. The only stamping on this is the Amuse sentiment. I used a corner rounder on the off-white Bazzill panel and popped it up on foam dimensionals so you could see more depth where the leaves are cut out.

My DH has deserted me and gone up to his sister's cottage in NH for a few days to help her with some renovations in her kitchen and bathroom - so I'm going to be here all alone with my kitties and probably have to stamp the whole time - don't you feel sorry for me!?!!? (That's why it's 2 am and I'm still up and posting a card!!)

Have a great weekend everyone - we just may float away here in rainy New England - but boy - is the grass really GREEN!

ETA: Hot tip! you must hop over and see the Waltzingmouse (Claire Brennan) she has samples of her new Irish Heritage stamp sets being released next Tuesday - and they are just lovely!!

Stamps: Amuse: Nature
Paper: white: PTI, Bazzill off white and brown, Baja Breeze: SU
Ink: Memento Tuxedo Black
Accessories: Spell binders flower Creations 3, Spellbinders Bird, Brad: Basic Grey, ruffled ribbon: Unknown, corner rounder, micron pen, foam dimensionals, Sizzix Leaf Stem

A Sketched Thanks and Clean & Simply Distressed

Here is my card for today's color challenge on Split Coast as well as last weeks Doubledog Dare Challenge from Anne (Itsapassion) to use scrapbook sketch SBSC#31 and to include a fashion accessory - The fan is my accessory! The stamps are Hero Arts and Amuse. We'd love to have you join in on our Double Dare Challenges - just post your card on Split Coast and use keyword DDC.

You can see all the Doubledog Dare Challenge cards here.
Stamps: Four Dolls: Hero Arts, Sushi Set: Amuse
Paper: So Saffron, Close to Cocoa, Bashful Blue, Basic Black, DP: all SU
Ink: Memento Tuxedo Black
Accessories: copics: E51, B14, Y38, 100, foam dimensionals, Forest Branches cuttlebug folder

And this is my clean and simple card using distressing and sponging for this weeks CAS challenge on Split Coast. My card is 3.5 x 3.5. I distressed the edges of the designer paper and sponged the edges of the card and the designer paper. I stamped the sentiment by Verve Stamps directly on the designer paper. Clean and simple! (well maybe it should be dirty and simple!?!)

Off to eat a quick supper and work on some more stamping projects! thanks for dropping by!

Stamps: Verve Stamps
Paper: New Leaf: PTI, DP - We R Memory Keepers Grandmas Kitchen: Pretty Pinwheel
Ink: New Leaf, True Black: PTI
Accessories: sponge, distresser: Heidi Swapp

A Royal Thank You

Julie Ebersole (Her Royal Rubberness) was the 100th Featured Stamper today on Split Coast - I cannot believe she hasn't been the FS yet - she is the queen of simplicity in stamping - especially with her Amuse Stamps.
I printed off several of her cards I want to case but finally chose this snowy cityscape card.

I just love the cityscape Amuse stamp and have used it several times on other cards on my blog. In CASEing Julie - I changed the sentiment, the base card and sponged clouds in the sky instead of using snow (although I LOVE the snow effect on her card - today I wanted a clear sky!)

This card also qualifies for Sharon's No Time to Stamp - Simple Thank You challenge seen here:

As always - I'm so appreciative of your coming by my blog!

Please be sure to check back here on Tuesday - I'll have some terrific news about a huge blow-out sale over at H&M Stamps!! It'll be worth your while - believe me!!!

Stamps: City Scape: Amuse Thankyou: Nature Set- Amuse
Paper: soft sky, Tempting Turquoise: SU, Vintage cream PTI, 4 bar Vintage blue note: Amuse
Ink: ocean tides: PTI, Soft Sky: SU
Accessories: sponge, hand made cloud template, clear crystal stickers, Prismacolor markers, Copics, circle punch, foam dimensionals

A Shiny New Year and a Chanukah Dreidel

The Double Dare Challenge that I do with some SCS friends was from Anne (jdmommy) this week and her challenge was to make a New Year's card with some shine or bling. I've been waiting to use this Happy New Year's hat stamp by Stampendous all year! So I whipped that right out - and I actually cased one of my own cards - (you can see it in my post below) because I just loved how the embossed city scape stamp by Amuse looks and thought it would work for this card too! I used a dotted blue designer paper for the sky and embossed stars from the Take a Bough set from Papertrey Ink.

You can see the other Double Dare New Years cards here.

Stamps: 2009: Karen Foster Snap Stamps, Hat: Stampendous, City Scape: Amuse, Stars: PTI Take a Bough
Paper: Grey Bazzill, White: PTI, Basic Black & DP: SU
Ink: onyx black versafine, embossing pad
Accessories: silve EP, hot gun, foam dimensionals, circle punches

I made these Dreidels as part of a gift I'm giving my bosses for Chanukah - I'll be putting some candies or nuts in these and I'll include some home made cookies and little breads wrapped up in a box or a plate of some sort (haven't gotten that all planned out yet!) I'll show you that when I get it all made up!I found the pattern on Martha Stewart.com under crafts - I searched on dreidel - I enlarged it about 200 times to make it a finished size of about 4 1/2 x 2. I punched a 1/4 inch hole in the top piece and inserted a 1/4 inch dowel and tied a silver ribbon (Papertrey Ink) around it. I put some glue around the opening inside and out that will hopefully hold the dowel in place!?! The piece on the left shows you how it looks before I taped it all together so you can see the images I silver embossed on the sides. The stamp set is Mazel Tov by Papertrey Ink.

Stamps: Mazel Tov: Papertrey Ink
Paper: Ballet Blue: SU
Ink: embossing pad
Accessories: silver EP, 1/4" dowel, 1/4 " hole punch, silver ribbon: PTI, tacky tape

Blog Candy Winner! Inspired Cityscape and Christmas Crafts

Happy Saturday everyone! Before showing my offerings today - I'm excited to announce the winner of my blog candy! There were 61 comments and Random Number Generator chose #32 as the winner and that is:

Bunny B who said...
I read you every time you update as you're in my reader :) I love your creations!!! Happy Holidays!!

So Bunny - Congratulations!! - send me an e-mail (julia.aston@comcast.net) with your address and I'll get that package right out to you!

And thank you all for your wonderful supportive comments of my blog - they really made my week!

First up for my projects to show you today is my card for the Inspiration challenge on Split Coast. Stef chose another fun ETSY site 'Block Party Press'. I chose this fun city scape necklace for inspiration.
I immediately thought of this Amuse city scape stamp that I stamped 3 times and embossed in silver. I adhered it with foam dimensionals and cut it to fit the full width of the card.I didn't use my embossing buddy before embossing the sentiment (Vippies)so the little extra flecks that stick with the static would look like stars in the sky. The embossed stars are from the Take a Bough set from Papertrey Ink. I embossed the large star with silver on black, cut it out and adhered it with a foam dimensionals.

Stamps: City Scape: Amuse, Stars: PTI Take a Bough, Sentiment: Vippies
Paper: grey Bazzill, white: PTI, Real Red, Basic Black: SU
Accessories: silver embossing powder, embossing pad, hot gun, foam dimensionals


And next I want to share a couple of fun Christmas crafts I found while surfing some blogs.
I found this cute idea for pops at this site although Ashley made them for candy canes. We're having a Christmas craft sale at church and I thought these dressed up our yummy chocolate/rice crispy lollipops that Jeannine made. The stamp I used here is from Papertrey's 2008 Holiday Tag collection with Ripe Avacado Ink from PTI.

Next up is this adorable little coaster frame for pictures with Santa (or any picture!) that I found on Lorri's blog here.
I added a picture of my sister Marcia and me (I'm on the left age 4!) Could my bangs be ANY shorter?!?!?

The picture is just clipped on so the purchaser can remove it and slip their photo right on. I used a heavy weight coaster for this and covered it with designer paper from SU. I punched a tag (Pure Poppy PTI) and stamped Merry Christmas from the All I Want for Christmas sentiment set by H&M Stamps on it. I attached the tag to a white card stock rectangle (2 1/2 x 3 1/2) and attached that to the covered coaster. The belt is 1/2" black grosgrain ribbon and the belt buckle is made from a 1" square of Summer Sunrise card stock (PTI) I punched two slots on it using the slot punch from Stampin Up to slide the ribbon through.

Lorri had attached magnets to the back of her coasters - but I made an easel stand for mine using a piece of coaster as shown. I scored it to allow it to bend and attached it with Scotch Quick Dry Adhesive - that's also what I used to attach the DP to the coaster.

Today I am so thankful that we have heat and electicity - we had terrible icing north and west of us on Thursday night (we just had torrential rain where I live) and my son lost his utilities at his condo so came with April and his two dogs to stay overnight with us (power was restored today to them) - and my sister lost her utilities and a giant tree branch fell on her car and blew out the back window crushing the trunk. Another beautiful birch tree out front came up by the roots and fell against their roof! But we are thankful there was no damage to her house or to them personally. They have been told their power may be out for 4-5 days so they hurried out to by a power generator - luckily they have a wood stove and running water.

Thank you so much for stopping by. I hope you are inspired by my crafts today to make some of your own!

Half a Wonder

First! a reminder to check out my blog candy here: you have until 7 pm EST tonight to comment for a chance to win! I'll post the random number winner Saturday.

The Ways to Use it Challenge on Split Coast was called the Half Baked Challenge - to use half of an image on your card. I stamped Mr. Moose (Amuse stamps) and cut him in half! The theme is kind of 'tongue in cheek' double entendre - the sentiment alluding to the wonders of the holiday season - but with this card it could also be about the hunting season - (poor moosey!) I added metallic skeleton leaves (to cover his missing hiney!) and the sentiment is cut with a spellbinders tag trio die. (and I just thought - I should attach his 'other' half to the back of the card - wouldn't that be a hoot for the recipient!?)

It was kind of a quick card - not having too much time last night to create - so no coloring or much embellishment - but that works for this masculine card anyway I think - don't you??

Thanks for coming by today!

Stamps: Amuse
Paper: Choc Chip, Naturals Ivory: SU, DP Basic Grey Figgy Pudding
Ink: Dark Chocolate: PTI
Accessories: gingham ribbon, spellbinders tag trio die, foam dimensionals, cuttlebug, metallic skeleton leaves.

A Twig Wreath and A Class at The Papertree

I got another Christmas card done today - Yippee!! I actually made 10 of these - I try to do 10 at a time so I'll have enough for mailing (which will be soon - won't it!!)

Todays card was made for the Featured Stamper challenge on Split Coast. Dawn (flowergirl36) was honored today. I chose this pretty Frosty Twigs card of her's to case.

I changed the stamp to a twigy wreath by PSX rather than a twiggy snowman and changed the location of the ribbon due to the size of my stamp - and I added a sentiment by Papertrey Ink. I loved her idea of the glitter background stamping and used that with a different background stamp (Pine Needles & Cones - Cornish Heritage Farms). I stamped the image using my Palette Stamp & Stick Glue Pad - then covered it with glitter.

Stamps: Wreath: PSX, Sentiment: Holiday Wishes: PTI, bg Pine Needles and cones: Cornish Heritage Farms
Paper: cranberry crisp, baja breeze: SU, white: PTI
Ink: Dark Chocolate: PTI
Accessories: Prismacolor marker: sky blue light, sheer dotted ribbon: Michaels, glitter: JoAnn's, oval punch: SU, foam dimensionals, Palette Stamp & Stick Glue Pad


Before I was able to stamp tonight - I spent the afternoon teaching a class at The Papertree, in Manchester, NH which is about 1 hour from where I live in MA. Michelle is the owner up there (Hey Michelle!!) and she has the most wonderful stamping shop! I teach a class there about once a month and always do a lot of shopping before I leave!

Today we made a double pocket bag (tutorial here on Split Coast) and an apron recipe card holder (tutorial here on my blog) for holiday gift giving. We used several stamps from Just Rite Stampers and one from Amuse. I also gave everyone a packet of Swiss Miss Cocoa and 2 home made biscotti since that was the recipe they put on the card tucked into the apron. This apron can slip into the double pocket card - or it also fits in a regular size envelope for mailing.

I'll be posting my biscotti recipe tomorrow morning (12/1) with my H&M Stamps Creative Gift Wrapping blog hop - so be sure to check it out!


And a big shout out to Linda, Debbie, Lisa and Maddy my fun classmates today!

It was snowing in NH so that really put me in the holiday mood - unfortunately - it was just rain at home!

Thank you so much for taking time out of your busy day to come by and say hello!!


Wrapping a Tree

Today's fun Inspiration Challenge on Split Coast was a web site of wrapping papers - here is the paper I was inspired by:

And here is the Christmas card I created from the inspiration.

I used the sweet winter tree from 'A Tree for All Seasons' retired Stampin Up set and punched circles with my hole punch to decorate it with. I added some shimmer to the circles, snow and snowman with my silver Spica pen. I cuttled the background with the Swiss Dots folder and used my Spellbinders ribbon tag die for the Papertrey Ink sentiment. The pink threaded ribbon is by Amuse. The image and sentiment are both up on foam dimensionals. This is a 4 1/4 x 4 1/4 card.

Thanks Anne (itsapassion) for guest hosting today and also for the wonderful inspirations!! Another Christmas card done!
Just a little toot of my own horn: if any of you get the Stampers Sampler magazine - one of my cards was published in the Dec/Jan 2009 Issue on page 55. 'Health and Longevity' It was chosen as a sample of using grid blocks on your card.

Hope you all have a great weekend - thanks for stopping by today!


Stamps: A tree for all Seasons: SU, Sentiment: Silent Night: PTI
Paper: Kiwi Kiss, cranberry crisp, pretty in pink, bordering blue: SU, White: PTI
Ink: Onyx black versafine
Accessories: pink stitched ribbon: Amuse, foam dimensionals, cuttlebug, swiss dots folder, prismacolor markers, silver spica, spellbinders ribbon tag, hole punch

Amuse Class and A Thanksgiving Wagon

As promised yesterday - here are more pictures of the Amuse Cupcakes Card Class that I took at the Papertree Store in Manchester, NH on Saturday.This is Linda, owner of Amuse Art Stamps, and Michelle, owner of the Papertree Store, and Julie Ebersole, designer and instructor for Amuse. The theme was cupcakes for my class and Michelle's friend Gayle made these delicious cupcakes for all to enjoy (seeing AND eating!). Aren't they just gorgeous!?!? They had a cream cheese frosting on them!And here are the 5 cute cupcake cards we made all from one Amuse clear cupcake stamp set.

Here is a close up picture of the LL Bean bags that I made for Linda and Julie using the cute holiday VW Amuse stamp as well as an Amuse Christmas sentiment. I filled the bags with delicious sugar & spiced nuts. I got this wonderful easy and delicious recipe from my blogging friend Denise (peanutbee on SCS).

Here's me again with the girls.And here they are instructing the class. They ran three classes that day but I could only stay for one (sigh).

So - with Amuse stamps on my mind - I used another one for the Featured Stamper challenge on Split Coast today.

Kendra was the featured stamper and I chose this pretty card from her gallery to CASE. I needed to make some Thanksgiving cards and thought her card/sketch would work well.I used a different stamp and different colors but the same design as Kendra. This is a 4 1/4 x 4 1/4 card. I like this size card more and more as you don't have to put a lot on it to fill up the space on it! Good for when you are making multiples and are trying to get them done quickly!
The designer paper is Basic Grey Mellow Deciduous - which is just perfect for the 'over the river and through the woods' theme of Thanksgiving don't you think?! The cute turkey wagon is by Amuse and the sentiment is Hero Arts. Inside I stamped "May our hearts be full of thanks today and always" which is an AiP's ViP's stamp.
Stamps: Turkey Wagon: Amuse, Happy Thanksgiving: Hero Arts
Paper: Spring Moss, Lemon Tart: PTI, Choc Chip: Su, DP: Basic Grey Mellow- Deciduous
Ink: onyx black versafine
Accessories: Prismacolor markers, oval nestabilities, cuttlebug, ribbon: Ripe Avocado - PTI, foam dimensionals