

 I made this one using the fun Basic Grey Lime Rickey/Liquid Candy designer paper for the castle panels. The base is a green Bazzill card stock. The knight is from Lizzie Anne Designs and the trees and sentiment are from two different Cornish Heritage Farms sets - Making the Grade and Forest Friendzy. I adhered a tree on each side of the castle as well as a hedgehog or mushroom.
These are all the stampings I used on the castle and the card below.
 Here is a card I made to go along with the castle - using the same stamps. I used the Forest Branches Cuttlebug folder on the back panel and a Labels Four Nestability to cut the piece of designer paper. All the images are colored with Copics. I used the small oval Stampin Up punch for the sentiment on the castle. For the card sentiment I juse used the corner rounder on one end and cut out a triangle on the other end. Everything is popped up on foam dimensionals.
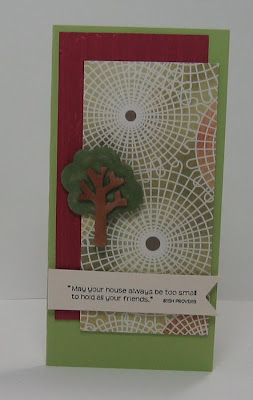
 I made this second castle a little more sedate. I thought it would be a fun Welcome to your New Home gift with some treats tucked inside. The sentiment is from Amuse and says "May your house always be too small to hold all your friends." Irish Proverb
 This designer paper is Basic Grey Porcelain/bellamy. The base of the castle is Certainly Celery by Stampin Up. The chipboard trees are from Maya Road.
On this castle I used the Distressed Stripes Cuttlebug folder on the roof piece and inked it with white chalk ink as suggested by Claire in her tutorial. The flag is just a strip of designer paper curled and glued around a toothpick with a triangle cut out of the end.
 And here is the coordinating card I made for this castle.
 The uses for this cute castle are limitless - wouldn't it be fun in pink and purples with a princess stamp for a little girls b'day? And they aren't as hard to make as they look - Claire goes through each step with pictures and written descriptions. I made one up with computer paper first just to be sure I understood each step - that way I didn't waste good card stock in the learning process!
  and here is the front view - we can see a little bit of Merry Meeting Lake through the trees - which is behind me as I'm taking this pic - the cottage is across the street from the lake but we have a right-of-way where we can access it.
 Here is Kent on the lake - and you can see the front of my kayak - we were out for two hours on this day - and just after we got back and up to the cottage we had a downpour! Rain can come quickly when you are in between the mountains here.
 And here's me! The water was pretty calm going down but on our way back we were heading into the wind - and we really had to paddle!
 This is one of our cats, Boo, sitting on the favorite pet sofa by the picture window - watching Kent as he makes his way to the door!
 Thanks for coming by today!
 And here is the coordinating card I made for this castle. The uses for this cute castle are limitless - wouldn't it be fun in pink and purples with a princess stamp for a little girls b'day? And they aren't as hard to make as they look - Claire goes through each step with pictures and written descriptions. I made one up with computer paper first just to be sure I understood each step - that way I didn't waste good card stock in the learning process!
 Thought you might like to see a few pics of our vacation: Here is a side view of my SIL's cottage in the woods from the driveway.
and here is the front view - we can see a little bit of Merry Meeting Lake through the trees - which is behind me as I'm taking this pic - the cottage is across the street from the lake but we have a right-of-way where we can access it. Here is Kent on the lake - and you can see the front of my kayak - we were out for two hours on this day - and just after we got back and up to the cottage we had a downpour! Rain can come quickly when you are in between the mountains here.And here's me! The water was pretty calm going down but on our way back we were heading into the wind - and we really had to paddle!This is one of our cats, Boo, sitting on the favorite pet sofa by the picture window - watching Kent as he makes his way to the door! Thanks for coming by today!
No comments:
Post a Comment