

With Origami you really need to see each step clearly as it can be confusing the first time you make anything. There are 11 steps shown here!
I suggest you use a piece of plain computer paper the first time you try to make this butterfly. Once you get it - you can whip them out in just a couple of minutes! It may take a few tries to figure out the folds so don't get discouraged. I hope my pictures help you visualize them.
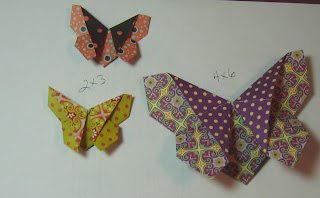
To make the small butterflies that end up to be about 1 3/4" x 2 " I used a piece of Origami paper 2" x 3". I purchased my paper at The Paper Source but there are many places to get it. I like the colors/patterns they have and you can see all of the pieces that you are buying - most packages you only see the first and last piece so you're not always sure what's in between!
You should use a piece of double sided Origami paper - ie. printed on each side - since both sides end up showing and it makes it more colorful. Note: Although you can use any kind of paper, it needs to be light weight so you can make good creases and folds. Origami paper is best.
So - let's take a deep breath and get started on it! My husband, Kent, was the photographer for me since both of my hands were busy!!
Step 1: Hold paper with the longer side at top and bottom, front side up.
 Step 2: Fold in half bringing top down to meet bottom and crease.
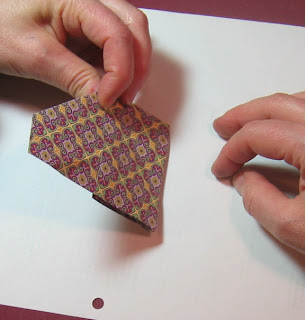
 Step 3: Open the paper back up, turn it over & rotate it so that the short side is at top and bottom (Note - I had already made a butterfly out of this piece so you can see many folds - yours will only show the center fold!)
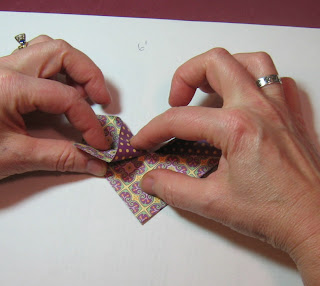
 Step 5: Lift right side up to the existing vertical center crease - open the edges on the right side and squash fold it (push the top fold down towards you where my right index finger is)
so it makes a triangle.

Crease the edges.


and crease it.


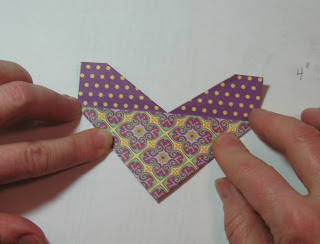
Step 11: Fold down the front wings from the top on each side.


Done! Phew! Good Job!
 And here is a 5 x 5 card I made to show you a large and 2 small butterflies. I used this designer paper as background as I thought it looked sort of like the bark of a tree where butterflies might be hanging out!
This Origami Butterfly design was created by Ralph Matthews from England. It is just one of the many Origami projects in the book called "Minigami" by Gay Merrill Gross published by Firefly books. I highly recommend this book. It has patterns for dresses, hats, purses, ducks, flowers and pots, fish, stars, penguins, santa and many others! I purchased mine at Borders Books and you can also find it on Amazon.com
Please let me know what you think of my tutorial and if you make some butterflies please link back here so I can see what you created!
Thought for the day from Poor Richard's Almanac: "The good or ill hap of a good or ill life, is the good or ill choice of a good or ill wife".
Thanks for stopping by today!
Stamps: Paptertrey Ink
Ink: Pitch Black Adirondack
Paper: Very Vanilla, Always Artichoke, Basic Black, DP: K& Co., Origami papers
Supplies: oval punches, Dimensionals
No comments:
Post a Comment