Showing posts with label Wedding. Show all posts

August Waltzingmouse SOAP - Day 3 - My Beautiful Girl

Here we are at day #3 of the Waltzingmouse Stamp of Approval Parade (SoAP)!! The Design Team is reviewing the WMS July release giving you more creative ideas on how to use the stamps you bought!

Today I'm parading the the fabulous prom/wedding gown set -  You're Lovely.

I found this fun 'hugs' card pattern by Dina Kowal over on Split Coast here.


The felt flowers are cut with MFT flower dies, the leaves are Spellbinders Foliage. The sentiment is on a Spellbinders Fancy Tags 3.  I adhered a rhinestone in the center of each flower.

I outlined the gown with my Brick White Copic and added a few pearls to the waist.  The sentiment is on a Fancy Tags by Spellbinders with the ends cut off so it would fit on the S (!) and I added a couple of rhinestones.  Both the sentiment and gown are up on foam tape.

Isn't this a fun shaped card?!!  If I had a daughter - I'd give her this card when she was getting married!

I hope you'll keep viewing the parade by visiting the other WMS Design Team linked below - and please stop by tomorrow for Day 4 where we'll all be parading on older WMS release - Afternoon Tea!

Anya Schrier
Claire Brennan
Jennifer Holmes
Julia Aston
Kate Whelan
Laurie Schmidlin
Lynn Mercurio
Mona Pendleton

Sarah Martina Parker
Tosha Leyendekker

Stamps:  Waltzingmouse - You're Lovely
Paper:  two green Bazzill's, white - PTI, textured off white - from my stash
Ink:  Memento Tuxedo Black, Ranger Distress Antique Linen
Accessories:  sticky pearls, white and green felt - Michaels,  Foliage, Fancy Tags 3, Fancy Tags (with ends cut off) - Spellbinders, Copics - E40 Brick White, Scotch Quick Dry Adhesive, Hugs Template from SCS by Dina Kowal, Modern label punch - SU, foam tape, glue dots, flower dies - MFT, rhinestones - Kaiser, wrinkled seam tape - Prairie Bird Boutique Etsy Shop.

WMS Sneak Peek Day 3 - Eat Cake with a Flourish in a Pretty dress!

Have you been loving the WMS Sneak Peeks so far??!!  Well -  today we have cakes, prom dresses and flourishes - what more could a stamper want I ask you???!!!!  The new sets we are highlighting today are Eat Cake, You're Lovely, and Flourishes - Scallops and Dots

For my projects today I made two tags- using plain old oaktag shipping tags from Staples!
For this tag -  I stamped a flourish from Flourishes - Scallops and Dots on the tag using white pigment ink and let it dry.  Then I sponged Old Paper and Milled Lavender dye inks all over the tag which made the flourish show up lightly in the background (do you see it?).  Then I stamped the cake and the lovely icing and larger draping  from Eat Cake and added some bling.  Finally I stamped the sentiment from yesterdays peek, Big Day Additions, sponged it, cut around it and layered it over the tag with foam tape.

My second tag is all about the prom with flourishes, sparkles and a pretty dress!

I used the same process for the flourish and sponging on the tag.  The flower, sentiment and dress are from You're Lovely and the flouishes are from Flourishes - Scallops and Dots.  I stamped the dress on white, sponged it, cut it out and layered it over the tag.

Now let's go see what the rest of the DT has for us today!     Be sure to come by tomorrow for the Design  Team Blog Waltz when all these wonderful new stamps will be available to purchase at Waltzingmouse!

Julia Aston  You're here!
Tosha Leyendekker

Bride + Groom Tag
Stamps:  Waltzingmouse - Big Day Additions, Eat Cake, Flourishes - Scallops and Dots
Paper:  Shipping Tag - Staples, Plum Pudding, white - PTI
Ink:  Ranger Distress Old Paper, Dusty Concord, Milled Lavender, Brilliance Moonlight white Pigment ink.
Accessories:  foam tape, rhinestones - Michaels, Blending tool + nonstick craft mat - Ranger, wrinkled seam tape.
At the Prom Tag
Stamps: Waltzingmouse - You're Lovely, Flourishes - Scallops and Dots.
Paper:  Shipping Tag - Staples, white, true black - PTI
Ink:  Ranger Distress Black soot, worn lipstick, fired brick, Brilliance Moonlight white pigment ink.
Accessories: Pure Poppy Satin Ribbon - PTI, rhinestones - Kaiser, foam tape, blending tool + nonstick craft mat - Ranger.

WMS Sneak Peek - Day 2 Getting Ready for the Big Day!

Hi everyone!   Did you LOVE all the cameos yesterday??!!    Well - hold onto your hats - today we're previewing two wonderful sentiment sets Big Day Essentials and Big Day Additions -  perfect for all of your engagement/wedding projects and so much more!
My first project to show you is a 'Save the Date' card - now I'm so old that we didn't send out notices like this - letting our friends know we were getting married in a year and to be sure and hold the date - but I got cards like this from both of my nieces when they were getting married!

I found these pretty gold scalloped note cards at Staples in the stationary section. First  I stamped text  from Text It across the top half.  I stamped the man and woman cameos from yesterday's Cameo to Go set, cut
them with oval Nestabilities that I sponged before removing from the dies, and layered them to black scalloped ovals.  The Save the Date sentiment is from Big Day Essentials and the numbers are from Victorian Alphabet.  To finish it off I adhered a tiny satin bow!

Keeping with the gold paper theme -  I also made a wedding card stamping another sentiment from Big Day Essentials on the gold cardstock, adding a few rhinestones and adhereing it inside a Nestability embossed frame.  I sponged the edges of the card with Ranger Old Paper ink.  I can't tell you about the stamp
I stamped with gold ink on the envelope!  Check back tomorrow to find out what it is!!!
And now - let's go check out what the rest of the DT has to show us with these new sentiment sets!

Julia Aston - You're here!

Save the Date:
Stamps: Waltzingmouse - Cameo to Go, Big Day Essentials (July 1 releases), Text It, Victorian Alphabet
Paper:  white, true black -PTI, gold scallop A2 card - Staples
Ink:  Ranger Distress Black Soot, Antique Linen
Accessories:  Oval scallop + mega rectangle Nestabilities, black satin ribbon - Michaels, foam tape.
May You Live Happily Ever After:
Stamps:  Waltzingmouse - Big Day Additions & mystery stamp!
Paper:  Fabriano note card, gold cardstock - Canford Card (from paper store)
Ink:  Ranger Distress Old Paper, Soot Black, Color Box Gold Pigment (on envelope)
Accessories:  Foam Tape, Mega rectangle nestability, rhinestones - Michaels, blending tool + non stick craft mat - Ranger.

Friends of WMS Blog Waltz - St. Pat's Day/Irish

Happy St. Patrick's Day stamping friends! Today I'm participating in the Friends of Waltzingmouse Blog Waltz taking place in the Playroom of the WMS forum. You can check out all the details here. This month's theme is St. Patrick's Day/Irish.


Since I don't need any more St. Patrick's Day cards for this year (!) I decided to go with a Celtic Wedding card with all the appropriate green!

The lovely Celtic heart stamp and wedding day sentiment are from the Celtic Heritage set. The beautiful frame is from the new set Very Vintage Labels 18. I used an oval Nestability to cut out the center of it - and since I don't have the Labels 18 Nestabilities yet - I just cut along the outside edge with my scissors!

This month there is a contest going on in the Playroom - post what your St. Paddy's day plans or memories are in the chat thread and a random entry will win a prize! There will also be a prize for one random card posting in the Waltz thread!
I'm also entering this into the Wee Memories Scrappy Saturday Challenge - to use green!

Wishing the luck of the Irish to ye today!!
Stamps: Waltzingmouse - Celtic Heritage, Very Vintage Labels 18
Paper: White, New Leaf - PTI, DP Bitty Dots Basics -PTI, October Afternoon Modern Homemaker.
Ink: Memento Tuxedo Black & Bamboo Leaves
Accessories: Oval nestabilities, Rhinestones - Kaiser, foam tape.

Ransom Love

The Ways to Use It Challenge over on Split Coast this week was Ransom Style - we were to use any kind of letters in different fonts, shapes and/or sizes (like a ransom note!)

I remembered that I had a bag of chipboard letters in black and white in my 'chipboard' drawer and so I looked to see what words I might be able to make out of what I had.

I wanted to use my brandy new Bold Ornament stamp from Rubbernecker and thought LOVE might be a good word to pair with it. I just added a couple of rhinestones to the ornament to soften the bold clunky letters a bit! My card is 5" x 5" square. I think it came out kind of cool!

Thanks so much for stopping by today! I always appreciate when you leave me a comment!

Stamps: Rubbernecker - Bold Ornament #507-01
Paper: white pure poppy, smokey shadow - PTI
Ink: Ranger Distress Fired Brick
Accessories: chipboard letters - Li'l Davis Designs, rhinestones - Michaels, glue dots

A Camera and a Wedding!

Alanna was the Featured Stamper over at Split Coast this week - I had not seen her gallery before so it was a pleasure to be introduced to it today. I actually chose 2 cards to CASE. For my first card - I was inspired by her camera card . I used a different camera stamp, used a coordinating DP for my background and added a punched fence.

Stamps: Imaginisce Snag Em Stamps - Scooters Vacation collection
Paper: rustic white - PTI, Riding hood red & black - SU, DP Imaginesce Scooters Vacation/click
Ink: Memento Tuxedo Black, Ranger Distress Tea Dye
Accessories: sponge and applicator - Ranger, copic R35, fence punch - Martha Stewart, small heart punch - McGill, foam dimensionals

My second card was inspired by Alanna's vintage wedding card

I've been wanting to use my new Kitchen Sink multi step Wedding couple so this was the perfect opportunity! I had to practice stamping it first to get it lined up correctly (there are 6 stamping steps with this set and multiple colors of ink to give it this great look). After I tried it the first time -the second time was easy - you just have to get used to the multi step technique which they explain on their web site.

I made my flower by punching a circle, cutting it into a swirl and rolling it up starting from the outside edge.

I just LOVE this wedding couple stamp don't you?!

Stamps: Kitchen Sink Stamps - Multi Step Wedding Couple
Paper: white - PTI, silver- Unknown, mulberry - unknown
Ink: Versafine Onyx blac, smokey grey, vintage sepia, Memento - Rhubarb stalk, cottage ivy,m angel pink, Brilliance perlescent beige, Versamagic - Wheat, pixie pink,, Ranger Distress tea dye
Accessories: Zva crystals, lace - from my stash, glue dot, sponge and applicator - Ranger

Three from Split Coast

This weeks inspiration challenge over at Split Coast came from the Oompa Toy Store web site. I went with this green lunchbox

I stamped and over stamped a weed and floral stamp from Rubbernecker using two colors of green. I used the mesh embossing folder on my back panel and sponged everthing with Tea Dye ink. I paper pierced around 3 edges of the image panel and added a little bling to the corners.

For my sentiment - I used a piece of a panel I cut with Labels One Nestabilities.

Stamps: Rubbernecker: Florals #496-03, Weeds #497-14, Sentiment/Floral Silhouette #467
Paper: Ripe Avocado, Rustic White, Spring Moss - PTI
Ink: Ranger Distressed Tea Dye, Adirondack Lettuce & Willow, Brilliance Moonlight White
Accessories: Rhinestones - Kaiser, Paper piercer & pad - SU, Mesh Cuttlebug embossing folder, ink sponge applicator - Ranger, Twill ribbon - PTI, Labels One Nestabilities
Techniques: dry embossing, sponging


Today's CAS challenge was to choose a cake from Carries Cakes web site for inspiration. I chose this blue pyramid cake


Here's what I stamped on the inside of my card. The sentiment is from Celtic Heritage.
Boy, what gorgeous cakes on this site!

Stamps: Waltzingmouse Stamps - Victorian Fripperie, Celtic Heritage
Paper: White, Hawaiian shores - PTI, DP Free digi paper - Sugar Plum Paper Daisies
Ink: Adirondack Espresso, Taken with Teal - SU
Accessories: adhesive paper ribbon - K&Co, Sticky Pearls, corner rounder punch, foam dimensionals


My third card is from the Try a New Technique challenge which was to make a flower (not just using a flower punch).
I made my flower using 4 scalloped circles that I sponged with Tea Dye ink and then crumpled up. I opened them up and attached a big black brad in the center (it has a reflection spot on it in the pic). I used the same DP for the flower as I used for the bg paper.
My stamps are from Fancy Phrases by Waltzingmouse Stamps I made this flower before using 12 scalloped circles but you would never ever be able to mail a card with that thick of a flower on it!! Using just 4 circles is thin enough to mail (although it will squish I'm sure!)
Stamps: Waltzingmouse - Fancy Phrases
Paper: White - PTI, black - SU, DP Unknown
Ink: Memento Tuxedo Black, Ranger distress Tea Dye
Accessories: prima artful flowers, glue dots, foam dimensionals, sponge applicator - Ranger, scallop circle punch - SU, large brad - American Crafts Elements

Speedy the Cats' Friends Challenge #7

Welcome to Speedy the Cats' Friends Saturday challenge! This week our challenge is to make your own designer paper using stamps.

I stamped this fun sentiment (A Fine Pear) repeatedly across my white card stock to create my DP. I first drew lines in pencil so I would stamp straight!!

Then I just added the sentiment popped up on foam dimensionals and the ribbon and charm. This card could be either a wedding or anniversary card.

The stamp set is a Mark's Finest Papers June release called Pears & Hollyhocks. The pretty gingham ribbon , gold thread and pear charm are also from Faith's store.

We'd love to have you join us in the challenges over on Marks Finest Papers Blog and to link your card there. You could win a free stamp set!

If you load your card over at Split Coast Stampers, please use Speedy's Friends in your keywords.

Stamps: Marks Finest Papers - Pears & Hollyhocks

Paper: White, spring moss - PTI

Ink: Spring Moss -PTI, Memento Tuxedo Black

Accessories: Ribbon, gold thread, pear charm - Marks Finest Papers, key tag punch, curly label punch- SU, foam dimensionals.

Be Happy Together - Forever

The CAS challenge over at Split Coast was to create a card using a greeting as your main focal point. For my card - I embossed a Labels 12 nestie frame using two sizes of the die. Then I just stamped the greeting inside the frame and added a leaf frond charm tied with a knot of gold cord.

The greeting is from the stamp set Pears and Hollyhocks by Mark's Finest Papers and will be available to purchase tomorrow (6/8)! The paper, charm and cord are also MFP. I think this card would be great for either a wedding or anniversary card don't you?
I'll be participating in the MFP DT blog hop on Wednesday using other stamps from this set so I hope you can come back to check that out!

Stamps: Marks Finest Papers - Pears & Hollyhocks (available 6/8)
Paper: textured cream - Marks Finest Papers
Ink: Memento Tuxedo Black
Accessories: charm & gold cord - Marks Finest Papers, Labels 12 Nestabilities, cuttlebug, glue dot

The technique challenge at Split Coast was to create a card that is personal and also uses a favorite technique.

I printed this photo of my husband's parents, Marjorie and Charlie onto cream cardstock.
Marjorie just passed away a week ago at the age of 94 and Charlie passed away 7 years ago at the age of 89. As they both wished to be cremated - we will be having a joint burial next week and a little party celebrating the love they had for each other and the love they gave to their family and friends.

This is a picture of them about 20 years ago when they took a long anticipated trip to Hawaii. They are dressed in their matching Hawaiian print outfits! In recent years, Marjorie would wear Charlie's shirt in her assisted living apartment.

One of my favorite techniques is to stamp a sentiment directly on a printed photograph and that is what I did here. This lovely sympathy verse is from a set called Irish Blessings by Waltzingmouse Stamps

I'm going to make two of these and send them to my DH's sister and brother -I think they will appreciate them!

Stamps: Waltzingmouse Stamps - Irish Blessings
Paper: white, vintage cream - PTI, Pacific Blue - SU
Ink: Memento Tuxedo Black
Accessories: Martha Stewart corner punch, sticky pearls

Sharing a Secret and Waltzingmouse Stamps!

I have been keeping a secret for a while now and I'm so very excited that I can finally share it with you!

Claire Brennan of Waltzingmouse Stamps has chosen me to be on her brand new Design Team !!! I LOVE, LOVE, LOVE (did I say LOVE?!?) these wonderful stamps with Claire's special 'Irish' touch to the sentiments and images.

So today she is having the GRAND OPENING of her new Waltzingmouse Stamps Web Store and has asked all of her Design Team to create some cards/projects highlighting her stamps. We'll be posting things all week so be sure to keep checking back!

Today - I wanted to use her wonderful label stamp from the Vintage Christmas set. I think a special tag dresses up even the smallest of gifts and makes them really special don't you??!

First I made two traditional Christmas/Holiday labels.

On this one I stamped the holly on blue card stock to be a contrast on the green tag. I cut it out and popped it up on a foam dimensional. The berries are on the holly stamp but are also a separate stamp so it's easy to stamp them a different color and cut them out to layer them on.

And here's a second one.

Then I looked through Claire's other stamp sets to see what else I could use with this wonderful label stamp. I found lots of ideas in the Celtic Heritage Set.

First I made a tag for a wedding gift - My niece just got married this past May and her colors were raspberry and avocado so that was the inspiration for my tag. I just love the claddaugh symbol of two hands sharing one heart.

Then I stamped up this cute little swaddled baby image for a new baby girl tag. Obviously this would be great for a new baby boy using blues - or in green, yellow or purple when you don't know what sex the baby is when you give the gift!

I have loved thistle ever since I visited Scotland several years ago where I saw so much of it on our travels through that beautiful country! I don't know what I would use this tag for !?!? but I love how it looks! - maybe a bookmark or a tag for a gift of shortbread cookies? First I stamped the thistle in avocado, then stamped it again in plum pudding, cut out the flower and layered it over the avocado stamping.

And finally I made a tag for a new neighbor gift using this pretty Irish scroll pattern stamp that fit perfectly inside the label oval! So - just because this label stamp is in a Christmas set - you can see how versatile it is for many other occasions!

Now I bet you want to see who else is on the Waltzingmouse Design Team???

I am just so thrilled and honored to be working with these talented ladies and with Claire's wonderful stamps!!


Be sure to check out their blogs to see what fun things they have to offer this week as well as checking out Claire's new Waltzingmouse Web Store!!
And check out Claire's blog to see her wonderful creations using 6 sets just released today!

Thank you SO MUCH for stopping by today and sharing my exciting news! If you have a few minutes - you can see all the projects I've ever made using Waltzingmouse stamps here.
Stamps: Waltzingmouse: Very Vintage Christmas, Celtic Heritage
Paper: Ripe Avocado, Pure Poppy, Enchanted Evening, white, Vintage Cream: PTI
Ink: Memento Tuxedo Black, Plum Pudding, Ripe Avocado, Berry Sorget, Enchanted Evening, Raspberry Fizz: PTI
Accessories: Large Eyelets: SU, Satin Ribbons - Pure Poppy, Ripe Avocado, Berry Sorbet, Raspberry Fizz: PTI, Crop a dile, foam dimensionals

A Sketchy Wedding Day

I made this card for the sketch challenge on Split Coast, as well as the Doubledog Dare Challenge I do with some SCS friends. Francie G's challenge to us was to make a wedding card. I used Waltzingmouse Stamps for my card today and Papertrey Ink papers and inks.

We'd love to have you join in on the Doubledog Dare challenge - just put DDC in the keywords when you load your wedding card into your Splitcoast gallery. You can see all the Doubledog Dare cards here.

I just passed 100,000 hits on my blog a few days ago - so there will be some serious blog candy available to win soon so be sure to keep checking back!
I may not be posting again until the weekend as I'm teaching two classes over at my favorite stamp shop - The Papertree in Manchester, NH - and I'm still preparing the materials (nothing like the last minute huh!?!?)

Stamps: Waltzingmouse Stamps: Irish Blessings, Celtic Heritage
Paper: PTI: Vintage Cream, OceanTides, Bitty Dot Basics
Ink: Ocean Tides PTI
Accessories: Vintage cream twill: PTI, Modern label punch: SU, Sizzlets Lots of Tags Label 1: SU, dew drop, Glue Dots, foam dimensionals

A Wedding Frame and Stamp New England News

Stef showed us the Design Dazzle website of kids rooms and bedding designs for inspiration today over at Split Coast. I was inspired by the colors and all the frames on the walls of this girls teen room

I had this frame from Michaels ($1!) and I have been wanting to create a wedding frame for my niece who got married a month ago. So today I was inspired to get it done!

I just love this reflection of the bride in the standup mirror stamp from the H&M set Fairy Tale Wedding .


We have a family heirloom just like this mirror and Katie had a picture taken of herself reflected in it - so it was perfect for this gift for her & Greg. My picture of Katie looks blury here - because of the reflection of the acetate panel over it - but it's clear IRL! Wasn't she a beautiful bride?! I love this picture of her standing on her sister's porch just after the wedding ceremony - she was just glowing! She's pulling the train of her gown up to her shoulders so it wouldn't get stepped on and I just had to snap the pic!


ALL of Heather's stamps over at H&M Stamps are on sale for the month of June so hurry over and check them out - once they are gone - they're gone - so shop early!!

And a heads up! Do you live anywhere near Farmington, CT? The Stamp New England organizers are planning another stamping weekend there for July 10th and 11th. Check it out here and sign up quick! The last event sold out in a week! I'm going to be teaching one of the classes (Yikes, I'm nervous!) so come so we can meet each other!!!

Stamps: Fairy Tale Wedding: H&M Stamps
Paper: White, ripe avocado, raspberry Fizz: PTI, basic black: SU, Water color paper
Ink: memento tuxedo black
Accessories: textile cuttlebug folder, cuttlebug, petite oval nestabilities, sizzix leaf stem die, silver ice stickles, copics: E34, E00, C1, BG10, brads: making memories, ribbon flowers - unknown (gift), acrylic paint, wooden frame: $1 Michaels

A Peeps Nest and How to Begin Forever

Here's a fun little spring treat I made to sell at our church - wouldn't these look super sitting at everyone's place on your dinner table for Easter???!! I found the instructions for making these on Ana Wohlfahrt's blog


Basically - you cut out 2 different size scallopped circles Nestabilities and then cut out the center out with a small circle. (I laid the smaller circle Nestability inside the larger scalloped circle on my cuttlebug and cut out both at the same time). You cut through one side of the scalloped circle - re-attach the ends overlapping about 3 scallops so it curves up. Cut little snips around the inside edge and bend up a little. Put glue around the inside edge and lay the small cut circle on top. Attach the smaller 'nest' over the larger 'nest' with foam dimensionals in the center so it pops up a bit. Add some shredded basket paper and your little peep and there you go! I used designer papers rather than stamped card stock on mine.


You can certainly use any size circles you want - just for reference - I used the 4 1/4" scallopped circle (measuring to outside edge) with the 2 1/4" plain circle and the 3 1/2" scallopped circle with the 1 5/8" plain circle.

In order to keep them clean and fresh for the sale - I placed my little nested peeps inside flat bottom bags from clearbags.com - folded over the tops - punched two slots in the bag and wove my ribbon through. I also stamped 'wishing you a happy Easter' on a tag trio and attached it along the bottom of the bag - but forgot to photo them after I added that!

Papers: Amuse, Crate Paper Seaweed Collection.

Accessories: couble rectangle punch: SU, scalloped circles and plain circles nestabilities, shredded basket paper, various color ribbons: PTI, Scotch quick dry adhesive, flat bottom clear bags: clearbags.com, Peeps Marshmallow chicks, foam dimensionals
Julie (Justwritedesigns) was the featured stamper on Split Coast this week- and I found this lovely card of hers to case. I changed the stamps, colors and punches used but kept her nice design. This pretty arbor stamp is from a set called Outdoor Fairy Tale Wedding by H&M Stamp Company
I used the Swiss Dots cuttlebug folder for the front panel that I also cut with my new Labels Four Nestability. The edge is punched with the fleur de lis punch by EK Success. I colored the arbor with Koh-I-Noor colour pencils and gamsol. I added a little knotted ribbon at the top. I used my hot gun on the ends to curl them a bit.

Thanks for coming by!

Stamps: Outdoor Fairy Tale Wedding: H&M Stamp Co
Paper: river rock: SU, Vintage Cream: PTI, water color paper: Carson (from art supply store)
Ink: Memento tuxedo black
Accessories: grey copic, Koh-I-Noor colour pencils & gamsol, sheer ribbon: Michaels, hot gun, oval punch: SU, Fleur de lis punch: EK Success, Swiss dots cuttlebug folder, labels four: Nestabilities, foam dimensionals

A Bride, A Blessing and A Button

My good blogging friend, Julie (juliemlacey) was the Featured Stamper this week over on Split Coast. Her gallery is just chock full of clean crisp GIANT cards! and talk about layers!! Can you count them all on her card below??!!For my CASE (copy and share with everyone) I changed the colors and the stamps - I didn't use as many layers - but kept the wonderful layout and I used her idea of not coloring in the image - just leaving the stamped outline. Sometimes coloring just makes things look too busy - an outline can be more elegant for certain cards as was the case here (IMHO).

The pretty bride and sentiment are from the H&M stamp set called Just Married. I added a pearl to her hair and a tiny gem (Amuse) necklace. My card is 5x5 so Julie's must be even bigger than that to fit on all those layers! Congratulations Julie on being the featured stamper!!
Stamps: Just Married: H&M Stamps
Paper: River Rock, Cranberry Crisp: SU, Vintage Cream: PTI, DSP: SU
Ink: Ripe Avocado, True Black: PTI
Accessories: foam dimensioinals, labels Two: Nestabilities, Vintage cream and Ripe avocado Twill: PTI, Little Gems: Amuse, pearls: Crystal Stickers

I made an Irish Blessing round top box for today's Try a New Technique challenge on Split Coast. You can see the challenge and the template for the box here (adobe file at end of challenge posting) I love this door stamp from River City Rubber Works and it seems like the only time I use it is with this Irish Blessing stamp for St. Patrick's Day! I stamped the door frame - then stamped the blessing inside (both are clear stamps). I just love this little treat box (will fill it with some St. Pat's Chocolate later!) I'll be using this for my craft sales at church - that's for sure!
Stamps: Door: River City Rubber Works, Sentiments: My Sentiments Exactly - Irish Blessings
Paper: Ribe avocado, Vintage Cream: PTI
Ink: True Black, Ripe Avocado: PTI
Accessories: tacky tape, narrow scalloped rectangle nestability, circle punch, scalloped circle punch, green basket filler, ripe avocado swiss dot satin ribbon: PTI, foam dimensionals. box template
Last but not least - is this card that I made for the 2nd CAS (clean and simple) Monday challenge on Split Coast - to use One Button and to limit your layers and other supplies.There is no stamping on this card! I used white rub-ons, one button on the flower and I did 4 score lines around the border. The paper is the retired Vintage violet - which I just love! It's such a great color - I'll be sorry when my supply is gone! Here's another example of keeping my New Year's resolution - I've had these rub on's for months - and just opened them for today's card!
Hope everyone had a good President's Day off - back to the grind tomorrow!!
Stamps: none
Paper: VIntage Violet: SU
Ink: None
Accessories: SU Rub-Ons - Love & Happiness, button, glue dot, scor pal

An Inspiring Cake

Stef always posts the Saturday Inspiration Challenge on Split Coast late Friday night. So - if I'm up I usually take a look and browse through whatever the inspiration is to get an idea of what I might do the next morning. Well - as often happens - I really got inspired and knew what stamps I wanted to use and just couldn't go off to bed until I got the card out of me!! I know a lot of you are knodding your heads in complete understanding of this phenomenon!!!

Here is the cake that inspired me to stay up late:This cake stamp from the H&M Stamp set Sweetly Stamped that I used on my card below is a perfect match for that cake - don't you think?!The leaves on the top of the cake are cut from a pretty leaf ribbon I have and I also added sticky pearls. I used my Textile and Swiss Dots Cuttlebug folders and Labels Two nestabilities. The cake is stamped on designer paper from Papertrey Ink and highlighted with a white gel pen. The sentiment is from another H&M set called Calling All Angels. I liked this kind of different sentiment - it might be a card that a bride gives to her groom the day of their wedding!

Here is a side view so you can see how the cut out Labels Two die is popped up on foam dimensionals. At first - I just had a white layer on the bottom - you can see it here - with the smaller Aqua mist color die cut over it ( the swiss dot layer) - then I played around with things a little - cut an aqua mist layer the same size as the white one - cut out the smaller size from the middle - (so it was like a frame) and held that over the cake and it looked better to me.
Sometimes that's how designs happen - sort of by mistake - just trying different things because something doesn't look quite right on an original layout....
So be sure to check out the fun cake web site on the Inspiration challenge! Maybe you'll be inspired too!!
Have a great Saturday and thanks so much for stopping by! Leave me a comment so I can come by to see you too!
Stamps: Cake: Sweetly Stamped - Sentiment: Calling All Angels - H&M Stamps
Paper: white, aqua mist, DP Everday blessings: PTI, basic black: SU
Ink: Onyx Black versafine
Accessories: white gel pen, Cuttlebug folders Textile & Swiss Dots, Labels Two Nestabilities, leaf ribbon, crystal sticker pearls, foam dimensionals

The Turkey Wagon, Fun in the Sun, and Wedding Souls

First up - the Turkey Wagon! That's the name of this cute Amuse stamp that I used on my challenge card. Holly's DTGD challenge over on Split Coast was to use her sketch and use lots of layers - which is what she usually does on her own cards.


This is the sketch - I turned it on it's side to accomodate my turkey wagon image!


I think I have 7 layers on this card - if I count them correctly! I pulled out this fun designer paper by Basic Grey called Deciduous and that led me to get this Turkey Wagon stamp by Amuse out to go with the trees! I colored my image with Prismacolor markers. The sentiment was in a clear $1 pack from Michaels. I added 3 dew drops in the top left corner to balance the sentiment. I attached the sheer dotted ribbon under the image and over the panel - I think it looks like the road the wagon is driving through the woods on! The ovals are all cut with my Nestability dies on my Cuttlebug. The Apricot Appeal panel is embossed with the Swiss dots Cuttlebug folder.

Stamps: Turkey Wagon: Amuse, Sentiment: Studio G Clear Stamps
Paper: Vintage Cream & Spring Moss: PTI, Apricot Appeal & Certainly Celery: SU, DP: Basic Grey: Mellow - Deciduous
Ink: Onyx Black versafine
Accessories: nestability ovals, cuttlebug, swiss dots folder, green swiss dots ribbon: Michaels, dew drops, Prismacolor markers, foam dimensionals, glue dots

Fun in the Sun is my card for Stef's Inspiration challenge over at Splitcoast. We were to find a blog banner that inspired us. Well - just as I was going to go look at some blogs - the ad for the cats pajamas stamps was showing at the top of the SCS screen and it had a cat in an innertube (and I have a stamp like that - well the inner tube part - not the cat part) so I clicked on it and found this. And it was my inspiration to make this card.I stamped my fun bug in his inner tube - masked him and sponged the ocean and sky, added a school of fish to the ocean and a sizzix die sun that I sponged with So Saffron and stamped a little face on. I cut the oval with my nestabilities and stamped the summer sentiment. The sun and sentiment are up on dimensionals.
Now go find a blog banner that inspires you to make a card!!
Stamps: Face stamp - unknown, School of Fish: Rubber Tree Stamps, Bug in tube: Alotastamps, sentiment: Hero Arts
Paper: White: PTI, Night of Navy: SU , yellow unknown
Ink: Not quite navy, soft sky, so saffron: SU, Sunset Orange: Adirondack, onyx black Versafine
Accessories: mask, Sun sizzix die, petite oval nestability, sponges, prismacolor markers, foam dimensionals

And finally, The Wedding Souls is my card for Joan's DTGD challlenge at Split Coast - to use a silhouette stamp on your card. I used this lovely wedding couple stamp from Artful Inkables Wedding Silhouettes set. I stamped it in black on white card stock and cut and embossed it with my oval nestability.

Then I cut out an oval from a white panel so I had a window. I cut the scallop oval out of black card stock and cut out the middle so just a frame was left and put that on the cut out circle. (stay with me now!)

I mounted the panel with thick foam dimensionals over the image. This also qualifies for the Ways to Use It Challenge - Negative thoughts - I used the outside (negative) piece left after cutting out the oval. I added stickles to the bouquet and head dress for a little sparkle.

Just a reminder: this Artful INKable wedding set is 10% off until the end of July so go on over there if you're thinking you need this pretty set!

Stamps: Wedding Silhouettes - Artful Inkables
Paper: White: PapertreyInk, Basic Black: SU
Ink: Onyx Black Versafine
Accessories: Thick foam dimensionals, crystal ice stickles, oval nestabilities

Two Weddings and a Vase

I've been stamping up a storm this weekend and haven't loaded up my cards so here are three
at once! This first card was made for the Featured Stamper on SCS - who was Denise (Denidill). She has a lot of wonderful cards to inspire and I chose this one today.I love the scored top on this and have been wanting to make a card using this design. I also needed some wedding cards for my stash. I changed the colors, the stamps used and didn't add buttons. I love this shimmery DP from Reminisce and I teamed it up with Shimmery White from Stampin Up. The papers have a beautiful shimmer in real life but it doesn't show well in the photo here. I used my nestability rectangles to punch and emboss.
This wonderful bride and groom stamp is from Artful Inkables and the sentiment is from PapertreyInk.
Inside I stamped 'always and forever' from the same PTI Wedding Day set. My husband said I shouldn't have used black ribbon on this card - I told him black is used for weddings now - what do you think??
Stamps: Artful Inkables: Wedding Silhouettes, Sentiments & heart: PTI Wedding Day
Paper: Very Vanilla, Shimmery White, Certainly Celery: SU, DP: Reminisce-Soft Sage
Ink: Onyx Black versafine, certainly celery
Accessories: Black Mayo Arts ribbon from Verve Visual, eyelets, crop a dile, rectangle nestabilities, scor pal

I made this card for a friend at work who asked me to make a wedding shower card with Wasabi green. I had this fun designer paper from SEI that matched the Wasabi card stock and this cute stamp set from Verve Visual. The Nestability ovals are punched and embossed and attached with foam dimensionals. I used my horizontal slot punch from Stampin Up to punch the openings to weave my ribbon through.

Inside I personalized the card using my Just Rite Monogram stamper and the sentiment from the Verve Visual Set.
Stamps: Verve Visual - Anniversary Birds & Flirty Phrases, inside: Just Rite Monogram stamper, little swirl above name: PTI-Faux Ribbon
Paper: White - PTI, Wild Wasabi - SU, DP - SEI Winnies Walls
Ink: Wild Wasabi - SU
Accessories: Striped grosgrain ribbon: SU, petite ovals nestabilities, circle nestabilities, horizontal slot punch - SU, foam dimensionals, ticket corner punch.
My last card for today was Saturday's Inspiration challenge on Split Coast. Stef showed us some images from an Acacia Catalogue and I chose this image for inspiration. A clear vase with flowers on the front and colored circles on the back.
I used acetate for the card to represent the clear vase. I stamped the flower silhouettes from Artful Inkables on the front using Stazon On White ink and then colored them a bit with my Stampin Up Markers.
On the inside I attached 1 inch punched circles of this beautiful Amy Butler Mat pack from K & Company. I stamped 'Love Blooms' from PapertreyInk Favor It Wedding set on the bottom right circle. The DP is double sided so I didn't have to cover the back as the pretty colors on the other side show. Acetate is kind of hard to work with - EVERYTHING sticks to or smears on it! And it's very difficult to photograph - I hope you can see the inspiration piece in this card.
So that's it for now! If you made it this far - thank you SO MUCH for stopping by and taking a look! Leave a comment so I can visit you on your blog too!
Stamps: Artful Inkables - Silhouette Flowers, Sentiment: PapertreyInk - Favor It Wedding
Paper: Acetate, DP: Amy Butler Mat Pad- K&Company
Ink: White Stazon, onyx black versafine
Accessories: 1 inch hole punch, vellum adhesive dots, SU markers - choc chip, old olive, more mustard

A Card with a View and A Card with a Knot

Happy Friday everyone! We had a gorgeous summer day here in Massachusetts today - sunny and warm but with a breeze and no humidity - not many days like this! I have two cards to show you today - first is my card that I made way too late last night (or early this morning!) for the Ways To Use It challenge on Split Coast - to use a photo on your card.
My DH and I went to Ireland a year ago in celebration of our 10th wedding anniversary and I took a gazillion pictures. The picture on this card is of the entrance to St. Kevin's Abby. I printed it on watercolor paper and cut the edges with dekle edged scissors to make it look like a photo edge (the way they used to when I was young - although they had a white border then also! does anyone else remember that?). I layered the photo to a cuttled panel and a DP panel, sponged everything in Close to Cocoa and added these great new Prima artful flowers and leaves. Aren't these flowers beautiful? and I love how the picture printed on the watercolor paper - it looks almost three dimensional here don't you think?

Stamps: Sentiment - Inky Antics
Paper: certainly celery, kraft, water color paper, DP - Basic Grey Mellow
Ink: Onyx Black Versafine, Close to cocoa
Accessories: Dekle edge scissors, primas artful collage flowers & artful leaves, sponge, foam dimensionals, distresser.

My second card was made for the Limited Supplies Challenge - to use a knot on your card.

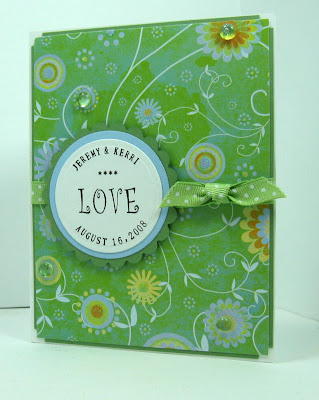
I was asked by a friend to make a wedding card for her to give to her niece and she wanted it personalized and to use Wasabi color. Luckily (!) I recently purchased the Just Rite Monogram stamps so was ready to take this card on!

I attached the ribbon to the back of the panels and then used a shorter piece and knotted it around the flat ribbon twisting it so the dots showed on each end of the knot. I cut the circles with my nestabilities and added dew drops on a few flower. This pretty paper by Die Cuts with a View has glitter already on the flower centers - don't know if you can see that in the picture.

Thanks so much for stopping by and taking the time to look at my creations - I'll be checking out your blogs too - leave me a comment so I can hope over to see you! Have a great night!

Stamps: Just Rite Monogram
Paper: White: PTI, Wild Wasabi, Bashful Blue: SU, DP: Die Cuts with a View Rosies Glitter Print-Pocket Full of Posies
Ink: Onyx Black Versafine
Accessories: foam dimensionals, ticket corner punch, dotted grosgrain: Michaels, Nestability Circles, dew drops,